Author: Daniel Lubel, Senior Purple Team Researcher
Since Windows 7, Windows maintains (by default) a journal of filesystem changes to a volume in a special NTFS metafile at $Extend\$UsnJrnl. This file has 2 alternate data streams (ADS) - $Max which contains data such as the maximum size and $J which contains the data about the changes.
The main usage of this file is by backup applications, to determine which files have been changed since the last backup operation.
In this blog post, we explain the usage of UsnJrnl in DFIR, walk through the process of efficient extraction for forensic purposes and provide the community with our own tool.
Why do we need it?
The USN records contain valuable information:
- Timestamp - The timestamp of the file change
- Filename - The name of the file that changed.
- Attribute – Mainly used to determine between file and directory
- Reason — The action which occurred, examples are:
- CLOSE
- DATA_EXTEND
- DATA_OVERWRITE
- DATA_TRUNCATION
- FILE_CREATE
- FILE_DELETE
- RENAME_NEW_NAME
- SECURITY_CHANGE
Forensics usage
During DFIR operation, this data can be useful to us in many ways:
- Sometimes attackers are familiar with different forensics methodologies and they can try to sabotage evidence, for example, by deleting the prefetch files. In this case, the record in the usnjrnl can be indicative and reveal the change times.
- This file can be used to detect files that were dropped to the disk, which is useful when building the timeline of occurrences.
- Attackers may try to delete their tools to avoid detection. While the file won’t appear in the file system, the deletion record will appear in the UsnJrnl.
Additional data about the USN can be found at the following great resources
- https://medium.com/velociraptor-ir/the-windows-usn-journal-f0c55c9010e
- http://forensicinsight.org/wp-content/uploads/2013/07/F-INSIGHT-Advanced-UsnJrnl-Forensics-English.pdf
That is cool, how can we get this file?
As this file is a metafile of the NTFS file system, it cannot be acquired just like any other file.
There are many tools which can be used to extract this file from an image of a disk, but not enough tools to extract it from a live system.
There is a great tool written in autoit by Joakim Schicht - ExtractUsnJrnl (https://github.com/jschicht/ExtractUsnJrnl), which can be used for the live extraction. Another interesting feature is the extraction size - the extracted file is only a few MB size, while other tools extract it to GB file size.
Unfortunately, his tool is recognized by many AVs as a malicious file, so we can’t take the risk of it being detected as malware. It is important that the user will feel safe and won’t receive alerts because of forensic actions, and as for the DFIR team, it is important that the collection won’t fail because of AV/EDR tampering.
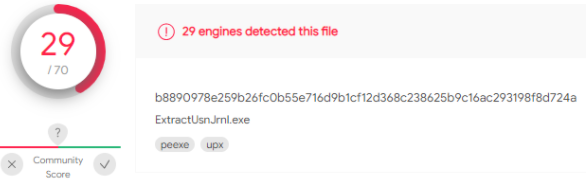
Detections by VT (of the 32bit version)
This was an interesting opportunity to understand the internal structure of the NTFS, by understanding the code and implementing our own version of it.
Our version is written in python3, which is a more popular language, and the big advantage is that there is a comfortable, modern debugger for it, so other researchers will be able to learn from it by stepping through the code dynamically.
Let’s get technical!
As the file can’t be acquired by regular means, our goal is to find the offsets of the file under the volume and rebuild it by ourselves.
On NTFS, while small files can be stored as part of the MFT itself, big files are stored at different locations on the disk and the MFT contains only the mapping to those chunks.
These mappings are called DataRuns. Each DataRun is constrained from chunks called Runs. Each run has a header, length and an offset which is relative to the previous offset.

Example from: https://flatcap.org/linux-ntfs/ntfs/concepts/data_runs.html
So how do we find this datarun?
First of all we start by accessing the volume we want to extract the usnjrnl from. We can do that by opening a handle to \\.\C: or \\.\PhysicalDisk<Num> (Usually 0). This requires administrative privileges, as a simple user cannot access the physical drive directly.
This can be done by simply using the python open command:
handle = open(r"\\.\c:", "rb")
At the beginning of the volume, we can find the boot sector, which contains information about the sizes used in the volume, like the number of bytes per sector, number of sectors per cluster, number of clusters to reach the MFT and more. We will use those sizes in the different calculations to find the physical addresses of the file parts.
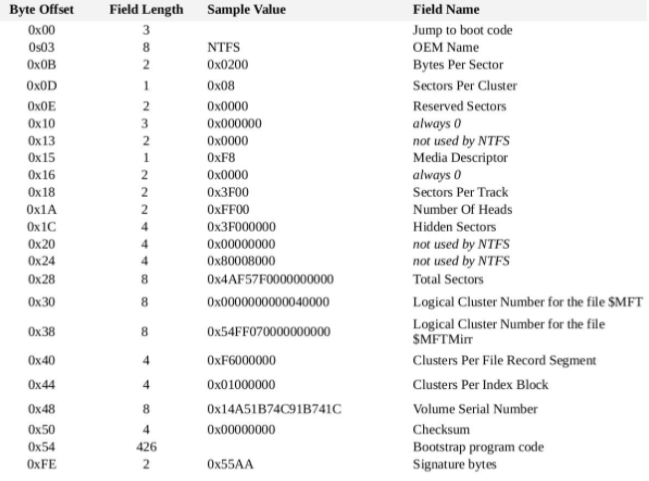
Image from: https://slide-finder.com/view/NTFS-Structure--Excellent.306294.html#slide5
In NTFS, all the data about the filesystem entities is saved in the MFT, this data includes references to the records of the files in the system which includes the datarun. It also includes data about metafiles like the UsnJrnl, which is our target.
The first entry in the MFT is of the MFT file itself. Using the datarun of the MFT record we will be able to find the references of the other objects used during the process.
As mentioned, the UsnJrnl is located at <partition>\$Extend\$UsnJrnl, which means that we need to find the references to the previous parts of the path.

Image from: https://en.wikipedia.org/wiki/NTFS#Master_File_Table
The first part is the Root Directory (.), from the table we can see that the reference of it is 5.
Using the datarun of the MFT, we can locate the location and get the actual MFT record of the root directory.
Each MFT record is built from many attributes, as seen in the following picture

Image from: https://docs.microsoft.com/en-us/openspecs/windows_protocols/ms-fscc/a82e9105-2405-4e37-b2c3-28c773902d85
Using the index_allocation attribute which contains the datarun of the root directory, we can find the INDX record, which is used to track the content of a directory.
- There is a four parts blog by Fireeye about INDX entries, if you are interested in going deeper, start with: https://www.fireeye.com/blog/threat-research/2012/09/striking-gold-incident-response-ntfs-indx-buffers-part-1.html
Under the INDX record, there are many entries that represent the files under the directory. A partial list of the files that are under the root directory:
0 $MFT
1 $MFTMirr
2 $LogFile
3 $Volume
4 $AttrDef
5 .
6 $Bitmap
7 $Boot
8 $BadClus
9 $Secure
10 $UpCase
11 $Extend
20 bootTel.dat
37 $Recycle.Bin
9281 pagefile.sys
.
.
.
27821 PerfLogs
27822 Program Files
27822 PROGRA~1
37990 Program Files (x86)
37990 PROGRA~2
47534 ProgramData
47534 PROGRA~3
50004 Users
52822 Windows
.
.
.
Using this data, we can find the next part of the path, the $Extend directory – entry 11.
As a directory, it will have the $I30 attribute which every directory in the file system contains.
After locating the $Extend directory, we will find its own record and as this is the location the $UsnJrnl exists in, we will check the index_root attribute to get the INDX record, and from it we will get the reference to the $UsnJrnl itself.
29 $Deleted
25 $ObjId
24 $Quota
26 $Reparse
27 $RmMetadata
62744 $UsnJrnl
Using this reference, we can locate the $UsnJrnl record in the MFT.
At this point we can dump the whole file, but we will use the same (very cool) method Joakim used, we will find the actual physical offsets of the file and dump only those. There are many advantages to this method:
- Less chances the extraction will fail due lack of storage on the target disk.
- As a DFIR team, we collect data and analyze it on our backend systems. With smaller evidence, the collection process will finish faster and we will keep less empty data on our storage.
The way we find only the relevant physical offsets is by parsing the $Attribute_list if available, or by parsing the $Data attribute.
Parsing the $Data is straight forward, as the data there is a datarun which can be used to get the offsets of the clusters.
On the other hand, the $Attribute_list requires some work. The $Attribute_list is a list of references to additional records on the disk that do not fit in the current MFT record. The last record is using the data from the previous one to get the attribute size required for the calculation of each raw offset size in the file.
By multiplying each of the offsets in the datarun with the number of bytes per cluster, we will have the number of bytes from the beginning of the volume of the current cluster.
Once we have all relevant offset, we will seek each of them in the volume, and dump its content to the disk.
def dump_to_file(raw_offsets, dest):
    with open(dest, "wb") as output:
        for raw_offset in raw_offsets[1:]:
            handle.seek(raw_offset.offset)
            data = handle.read(raw_offset.bytes_per_run)
            written = output.write(data)
Once the process is complete, the UsnJrnl is extracted. Now you can use different parses to convert it to human readable format like csv. There are some tools for that, like UsnJrnl2Csv (https://github.com/jschicht/UsnJrnl2Csv) by Joakim, which can handle the smaller version also.
You can find our tool on github: https://github.com/otoriocyber/UsnExtractor
And remember, You’ll Never DFIR Alone!